Settings
Manage your store connections, billing, business identity, fulfillment behavior, and account security.
7 min read
Settings is a single scrolling page with five panels: Connections, Billing, Business, Fulfillment, and Security. Together they control how orders reach you, which card is charged to produce them, the identity your customers see, how orders are made, and how you sign in.
Overview
Open Settings from the left-hand navigation in your Workspace. It is a top-level item at /settings. On a narrow screen, open the hamburger menu first. On desktop, the command palette (⌘K) can also jump you there.
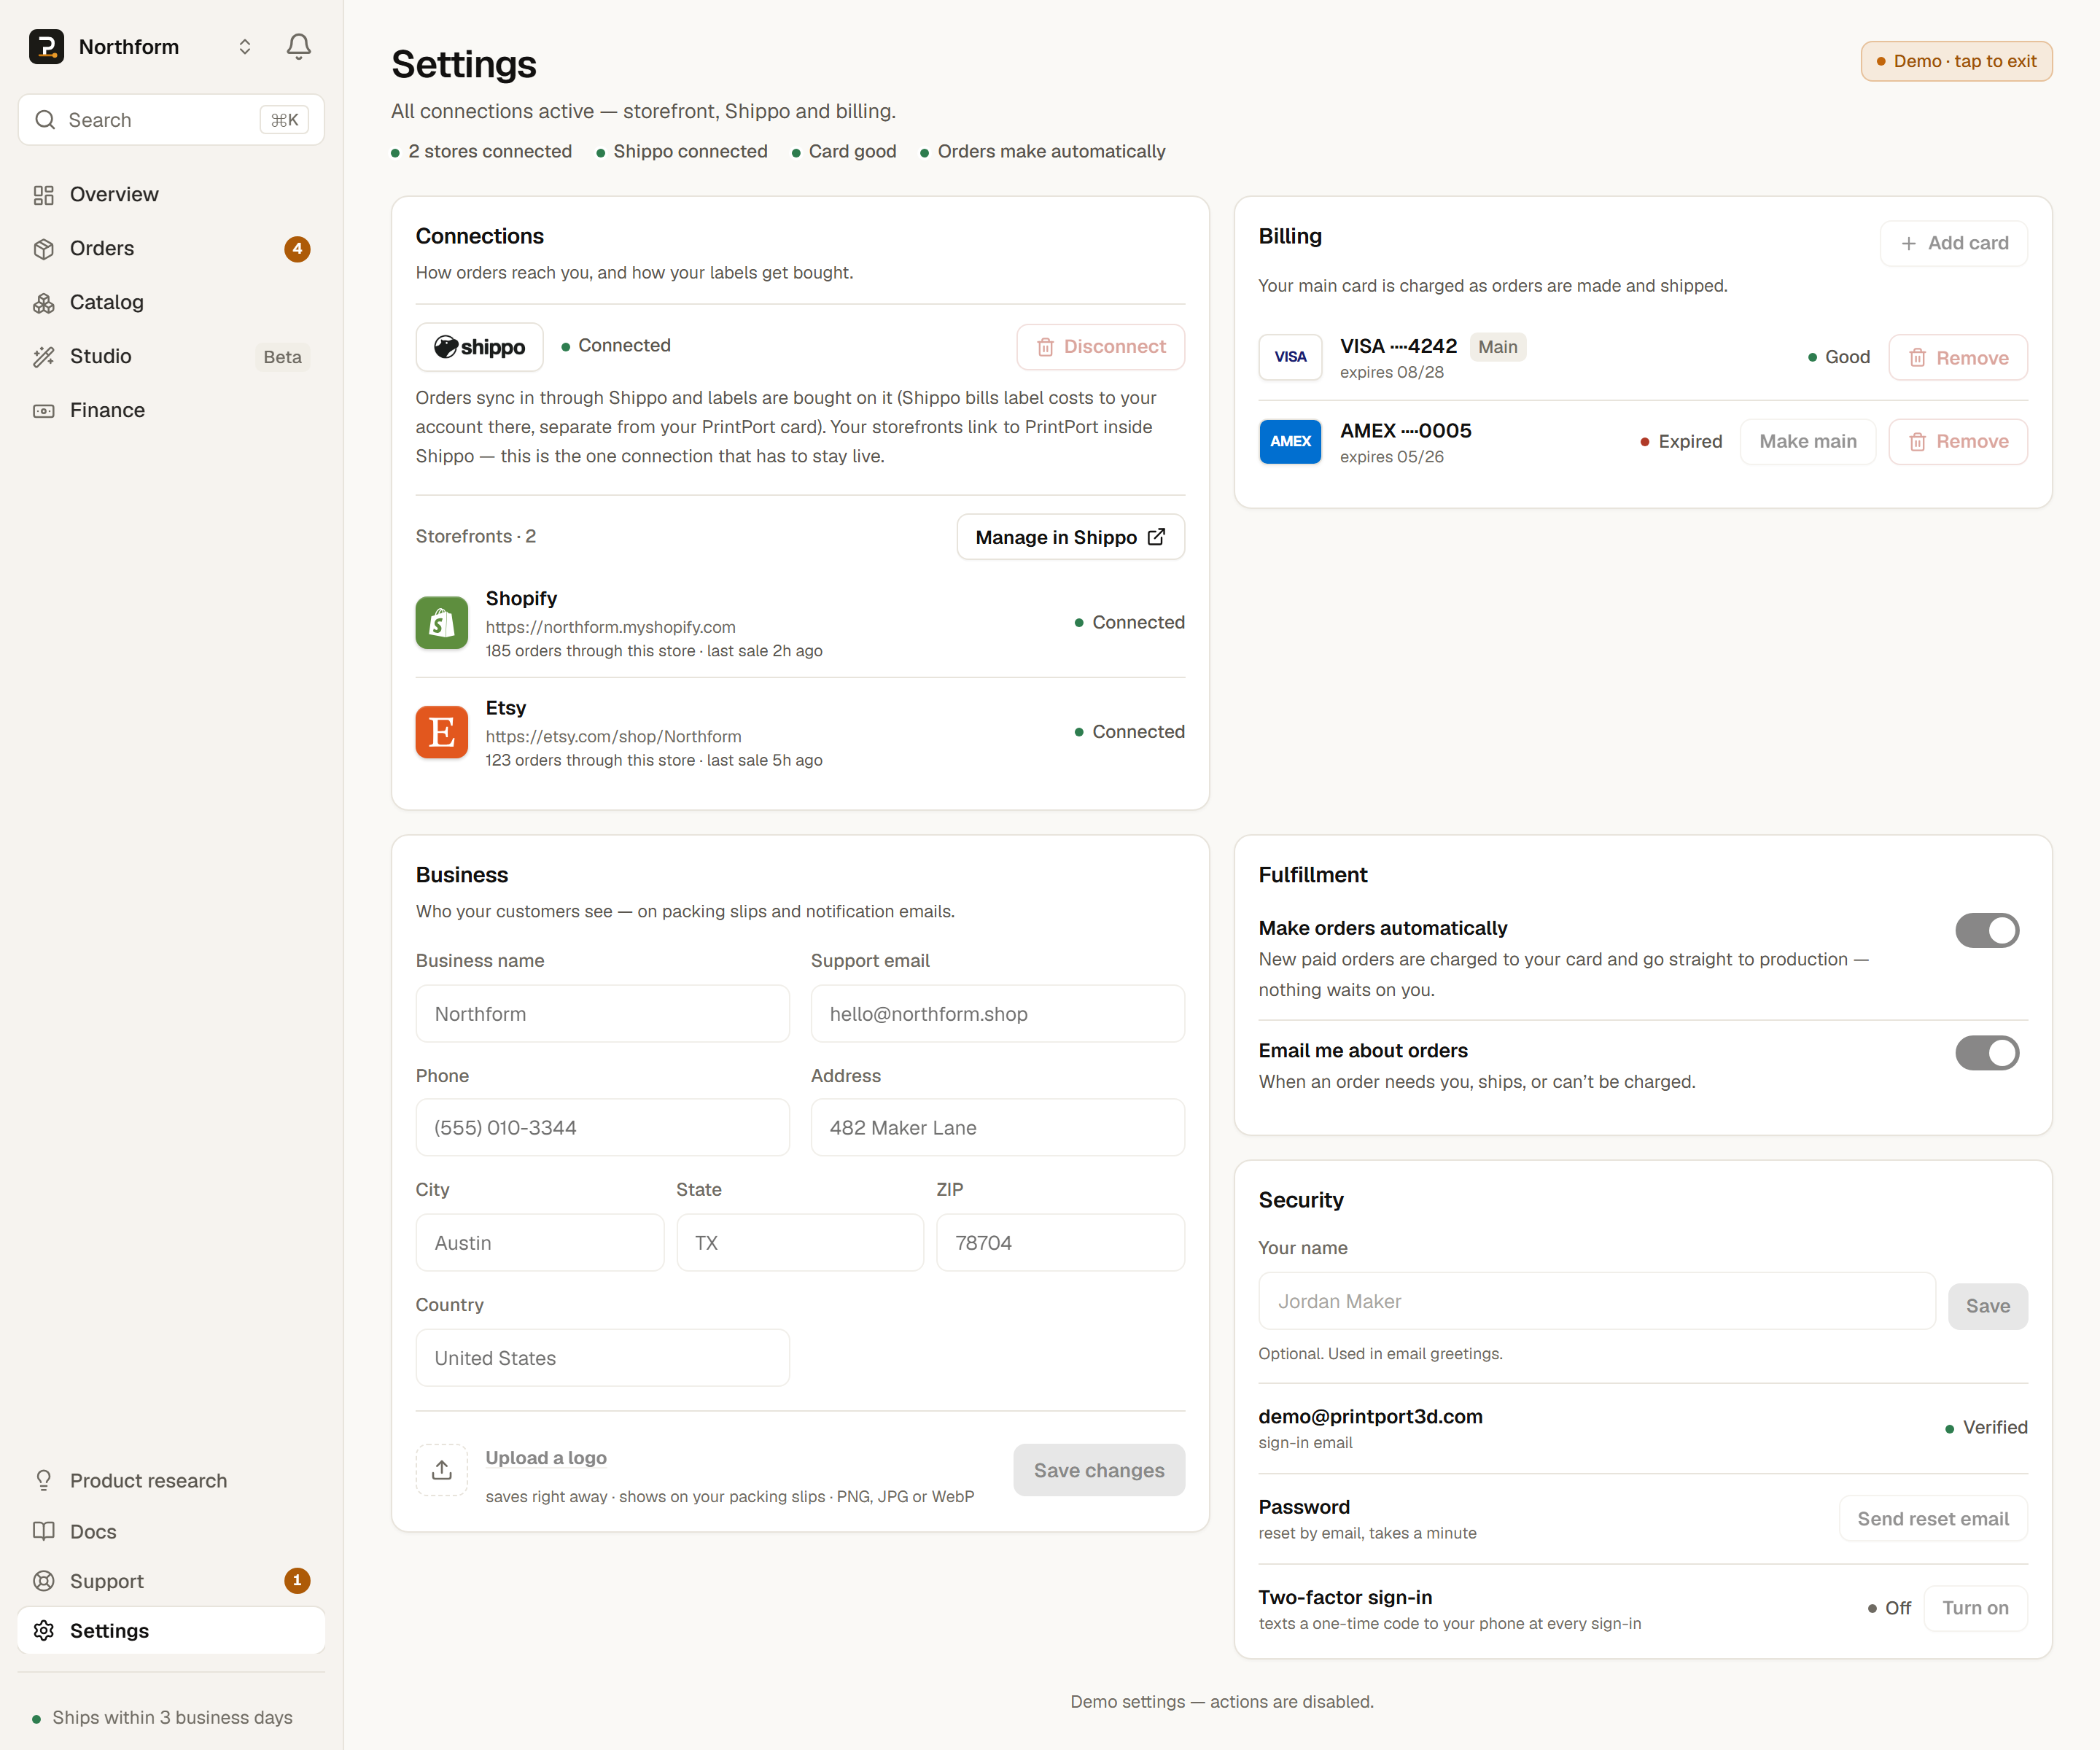
The page opens with a health band: one line that surfaces the most important item to fix, alongside status dots for your stores, Shippo, card, and automatic fulfillment. When everything is configured, the band confirms it. When something needs attention, it names the panel to scroll to.
The health band shows the most severe issue first. Clear it, and the next one surfaces.
| Signal | What it means | How to clear it |
|---|---|---|
| No card | Orders cannot be produced without a card on file. | Add a card in Billing. |
| Card expired | Your main card is past its expiry month. | Add a valid card and make it main. |
| Card expiring | Your main card expires within 60 days. | Update it before it lapses. |
| Email not verified | Some actions are locked until you verify. | Resend the email and click the link. |
| Shippo off | No new orders arrive and no labels can print. | Connect Shippo in Connections. |
| No storefront | No store is connected inside Shippo yet. | Connect a store in the Shippo dashboard. |
- No cardWhat it meansOrders cannot be produced without a card on file.How to clear itAdd a card in Billing.
- Card expiredWhat it meansYour main card is past its expiry month.How to clear itAdd a valid card and make it main.
- Card expiringWhat it meansYour main card expires within 60 days.How to clear itUpdate it before it lapses.
- Email not verifiedWhat it meansSome actions are locked until you verify.How to clear itResend the email and click the link.
- Shippo offWhat it meansNo new orders arrive and no labels can print.How to clear itConnect Shippo in Connections.
- No storefrontWhat it meansNo store is connected inside Shippo yet.How to clear itConnect a store in the Shippo dashboard.
The five panels are covered below in order. Most changes are deliberate actions: a button, a toggle, or a two-tap confirmation, rather than a silent auto-save. The two exceptions, the fulfillment toggles and your logo, are noted where they appear.
- ConnectionsShippo + stores
- Link Shippo, the single channel your orders arrive through, and review your connected storefronts.
- Billingcards
- Add and manage the card PrintPort charges to make each order.
- Businessidentity
- The name, logo, and support address your customers see.
- Fulfillmentbehavior
- Whether orders are made automatically, and whether we email you about them.
- Securitysign-in
- Verify your email, reset your password, and enable two-factor sign-in.
Connections
Everything you sell reaches PrintPort through Shippo. Orders sync in through it, and shipping labels for your store orders are purchased on it. There are no direct marketplace integrations. Shippo is the single channel, and connecting it is the one requirement that must succeed.
- 1
Click Connect Shippo
A Shippo window opens. Sign in or create a free Shippo account and authorize PrintPort3D. You need a verified email first; see Security. - 2
Return connected
When you come back, Settings confirms Shippo as connected. If it reports “Connecting shipping didn't finish — try again,” run the connection again. - 3
Connect your stores inside Shippo
Use the Shippo dashboard to link your Shopify, Etsy, or other stores. Those connections live in Shippo, not here.
Storefronts are read-only here
Each store row is verified against live data, not merely listed. PrintPort counts your real orders from that channel and shows a summary such as “12 orders through this store · last sale 3 days ago.” A store that is connected but has no orders yet shows a warning: “no orders seen from this store yet — check your listing SKUs match your Catalog.” This is almost always a SKU mismatch. The code on your listing must match your PrintPort product exactly.
Disconnecting Shippo
To unlink Shippo, click Disconnect. The button arms to “Really disconnect?”; click again to confirm. While Shippo is disconnected, no new orders arrive and no labels can be printed, so disconnect only when you intend to. The status shown is checked against Shippo on every load, so it reflects the current state even if something changed on Shippo's side.
Billing
Billing manages the card PrintPort charges to make your orders. Click Add card to open a secure Stripe form for the name on the card, your country, and the card number. Your first card automatically becomes your Main card, the one we bill.
Verify your email before adding a card
Each saved card shows its brand, last four digits, expiry, and a state:
- Good — nothing to do.
- Expiring soon — within 60 days of its expiry month. Add a fresh card before it lapses.
- Expired — past its expiry month and cannot be charged. Replace it.
On any non-main card, Make main switches which card we bill. Remove requires a two-tap confirmation. If you remove your main card, PrintPort automatically promotes the next card to main, so you are never left with a valid card that is not the one we charge.
What this card is charged for
Business
The Business panel controls your public identity: what customers see on packing slips and notification emails. Every field is optional, and leaving any blank does not block you. Complete the fields you want customers to recognize.
- Business name
- Your store or brand name on packing slips and emails.
- Support emailvalidated
- The address customers reach you at. It must be a valid email format, or the save fails with “Invalid support email.”
- Phone
- A business phone number, if you want one displayed.
- Address, city, state, ZIP, country
- Your business details. All optional. This is not a shipping return address.
Edit the fields, then click Save changes. The button activates only after you have changed something, so an accidental click cannot overwrite your existing details.
Your logo saves as soon as you select it
Your ship-from location is PrintPort's own facility in Orange, CA. Nothing in this panel changes where orders ship from.
Fulfillment
Two toggles control how orders behave and whether we email you about them.
- Make orders automaticallydefault OFF
- Off: every new paid order waits as Held for approval until you approve it, and your card is charged only when you do. On: paid orders are charged to your main card and go straight to production without further action. This is off by default, so nothing prints or charges without your approval.
- Email me about ordersdefault ON
- Sends email when an order needs you, ships, or cannot be charged. Your first verified sign-in enables this, and email flows once the setting is applied, so onboarded sellers already receive notifications. Leave it on to keep them.
Both are instant toggles: change one and it saves on its own, with an automatic revert if the save fails. There is no SMS option and no other notification switch on this page.
Automatic mode needs a working card
Security
The Security panel covers three tasks: verifying your email, resetting your password, and enabling two-factor sign-in.
Email verification
Your sign-in email shows Verified or Not verified. Verification is a hard requirement: until it is complete, adding a card, connecting Shippo, and enabling two-factor all remain locked. If you are not verified, click Resend, then open the email and click the link.
Signed up with Google?
Password
Click Send reset email and follow the link to set a new password. The email goes to your sign-in address.
Two-factor sign-in
Two-factor sign-in texts a one-time code to your phone every time you log in. Turn on asks for your phone number and texts it a 6-digit code to confirm it. A US number can be typed as-is, such as (555) 010-3344; outside the US, start with your country code, such as +44 20 7946 0958.
If PrintPort needs a fresh sign-in partway through setup, it asks for your password in place and resumes where it left off, without a full logout. Turning two-factor off requires a two-tap confirmation and is also password-guarded.
Verify your email first, and keep your device